0
With blizzard warnings and snow falling, photographers shouldn’t shy away from taking amazing photographs during the winter months. Guest Blogger, Christopher O’Donnell, share his winter landscape expertise with our members.
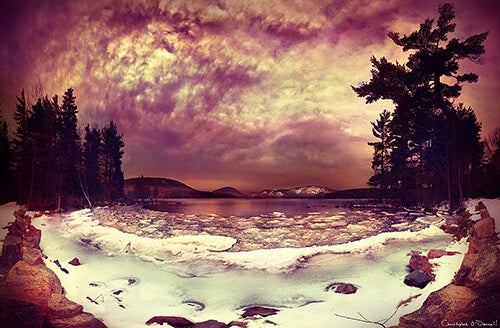
A snow-covered scene is a favored subject for most photographers, not just those who focus on the landscape. Snow has the ability to add interest and texture to any environment, and the opportunities to expand your creative horizons are endless. In particular, falling snow or windblown scenes create a surreal environment that is not only visually attractive, but can evoke a deeper, emotional response to your photography.
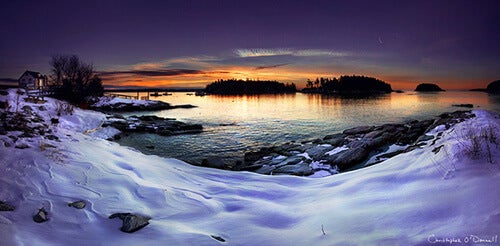
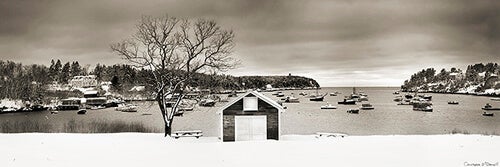
Black and white photographers are particularly fond of snow, as it expands the tonal range and contrast to a landscape that lacks any variation until the spring bloom. The smooth transition of tones across the curvature of snow can transform the topography, allowing you to capture a landscape under a stunning blanket of white.
However, the unique conditions that snow provides also comes with their own workflows in order to capture a scene in the manner you intend – in particular, two challenges that you are often met with are obtaining the proper exposure for snow, and how to capture snow as it falls.
Whether you choose to process your image as a black and white or in color, snow doesn’t look quite right with many shades of gray. This doesn’t mean that you should eliminate all of the darker tones – in fact, shadows can add depth and texture, which helps define the variations and curves across your scene. However, some values of your image should be near to pure white (without being overexposed) to act as a reference point. If your entire snowscape is just varying levels of gray, then your snow will appear “dirty” and underexposed, which is most likely not your goal.
An easy way to judge your exposure in the field is to look at your histogram. Overall, are your tones gathererd to the left (underexposed) or to the right (overexposed)? Shooting “to the right” is not only preferred in most situations, but will put you in a prime position to fine-tune your exposure in post process, if neccesary.
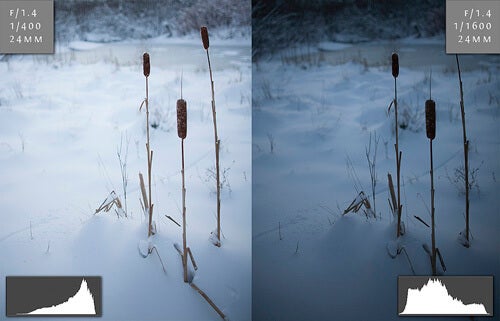
By comparing the exposures between these two frames – more specifically, the histogram – you can see that the longer shutter speed allowed for more light to hit the sensor, thus eliminating the “grayness” of the snow that is seen in the shorter exposure to the right. The snow appears more natural and pristine when shot at 1/400ths, and the blocked shadows (underexposed areas) are now eliminated.
The histograms of each image can tell you much about your exposure, and is a fantastic tool that I use often in the field. You’re not always able to tell for certain how correct your exposure is just by looking at your LCD, and your histogram will let you know how well your image is exposed without any guesswork.
You’ll notice that in the properly-exposed photo to the left, the tones are gathered to the right, which is a desired result when your frame consists of mostly snow. Opposite this image is the underexposed version shot at 1/1600ths, and the histogram reflects this well with most tones gathered on the left side.
Of course, the distribution of your tones is entirely dependent on your intent, and also the content of your image. This scene is filled with snow, so it makes sense that most tones are to the right. However, if you’re shooting a snow scene with other elements – such as buildings, tree lines, or water – than you’ll need to read your histogram critically to avoid over or under exposure.
At times, you’ll come across a snow scene that is impossible to expose correctly across the frame – most often when the sky is present in your composition. You’ll have one of two results – properly exposed snow with other elements over and/or underexposed, or snow that is not exposed properly with the remainder of your scene looking accurate.
This is an unfortunate limitation of your camera – not being able to combine different shutter speeds within the same frame – but can be conquered if you know the proper workflow. Depending on your scene, you can either exposure blend or use GND filters to correct your exposure throughout your composition. Click here to read more about either of these methods.
Much like photographing any moving object, falling snow requires that you use a fast enough shutter speed to freeze the motion. The exact shutter speed can change greatly depending on many aspects, both with your camera and the elements in your frame – the amount of available light, speed of snowfall, and your combination of aperture, shutter speed, and ISO all have a part to play in both capturing flakes as they fall while having your image being properly exposed. It’s a delicate balance, and will take some adjustments in the field, but is attainable with practice and knowledge of how changes in your manual settings can affect both your exposure and how your scene is rendered.
A common issue that many photographers encounter when photographing the snowfall is a lack of available light. Since snowfall usually occurs during overcast, the amount of natural light you have is limited, which can ultimately affect your shutter speed. If you can’t obtain a fast enough shutter speed, your flakes will appear as streaks across your frame – or if your shutter is very slow, the flakes won’t register at all.
If you find yourself challenged to freeze motion and also have your image properly exposed, there are several changes you can perform – widen your aperture, increase your ISO, or try a shorter focal length. All of these steps will gradually increase the amount of light that enters your camera, thus allowing you to capture the falling snow
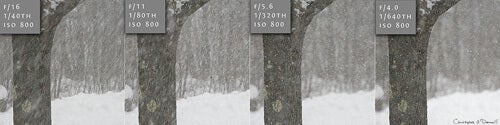
For the images above, I used a 300mm prime lens and focused on the tree, which was about 50 feet away. I took some test shots with an ISO of 100, but none of the shutter speeds were fast enough to freeze the action, which prompted me to increase my ISO to 800 for this series.
As you can see, the slow shutter speed of 1/40th that I obtained with an aperture of f/16 was not fast enough to freeze the flakes as they fell. Instead of increasing my ISO further – which I could have done without much noticeable noise – I decided to widen my aperture. In this side-by-side comparison, you can see that as my aperture widened, the snowfall looks quite different as my shutter speed increased. If I were to choose one image to use, I would select the f/5.6 aperture – it’s fast enough to render the falling snow without streaks, but my depth of field isn’t too shallow where I lose many flakes as they are thrown out of focus.
However, there’s more to photographing falling snow than finding the best shutter speed. Your chosen focal length has much to do with how your snowflakes will appear – most importantly, their size and layers. Longer focal lengths compact your distances and increase the size of falling flakes, which will give you varying degrees of snowflake weight, and will also produce a layered effect.
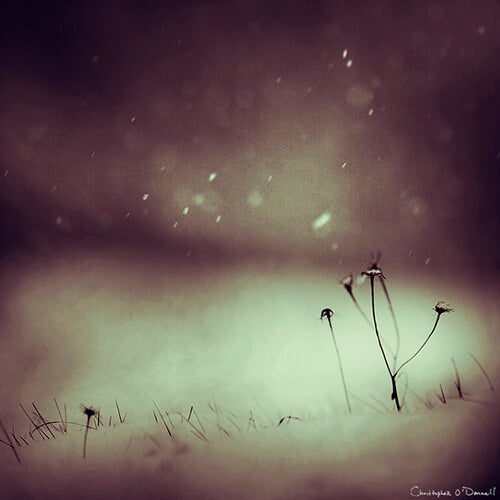
Also note that the longer your focal length is, the more shallow your depth of field will become for a given aperture. In the image above, I used a focal length of 300mm set at f/4, which gave me multiple layers of snowflakes at various sizes – yet many are out of focus and transformed into soft bokeh, which adds texture and depth. By using a longer focal length, you can create multiple layers of snowflake interest by flattening the distances – even during a very light snowfall.
By knowing how to achieve the results you want, you can avoid much frustration in the field, allowing you to focus on the creative aspect of photographing snow.

Christopher O’Donnell is a very talented landscape photographer residing in New England. He share his passion for photography and education on his website christopherodonnellphotograpy.com. This blog post originally appeared on the photographyblogger.net site. It has been modified and approved for our site by Christopher O’Donnell.
 Facebook
 Twitter
 LinkedIn
 Email
Email